Sunday, March 26, 2023

Solar Rack Rebuild


I noticed last summer that the wooden rack to hold the solar panels was falling apart. The heavy snow in the winter was too much and the rack did not look like it would survive another winter. I needed to replace the rack supporting the solar panels or risk losing the entire rack with solar panels. This was not a project I had on my list, but one that had to be done before winter.  The pedestal and solar panel rack had performed very well over the last several years. Initially, I only had it set to an inclination of about 30° which was too low. At that angle, the snow accumulation was too much to keep clear in the winter. I raised the angle to about 40° the following year which did much better at shedding the snow.
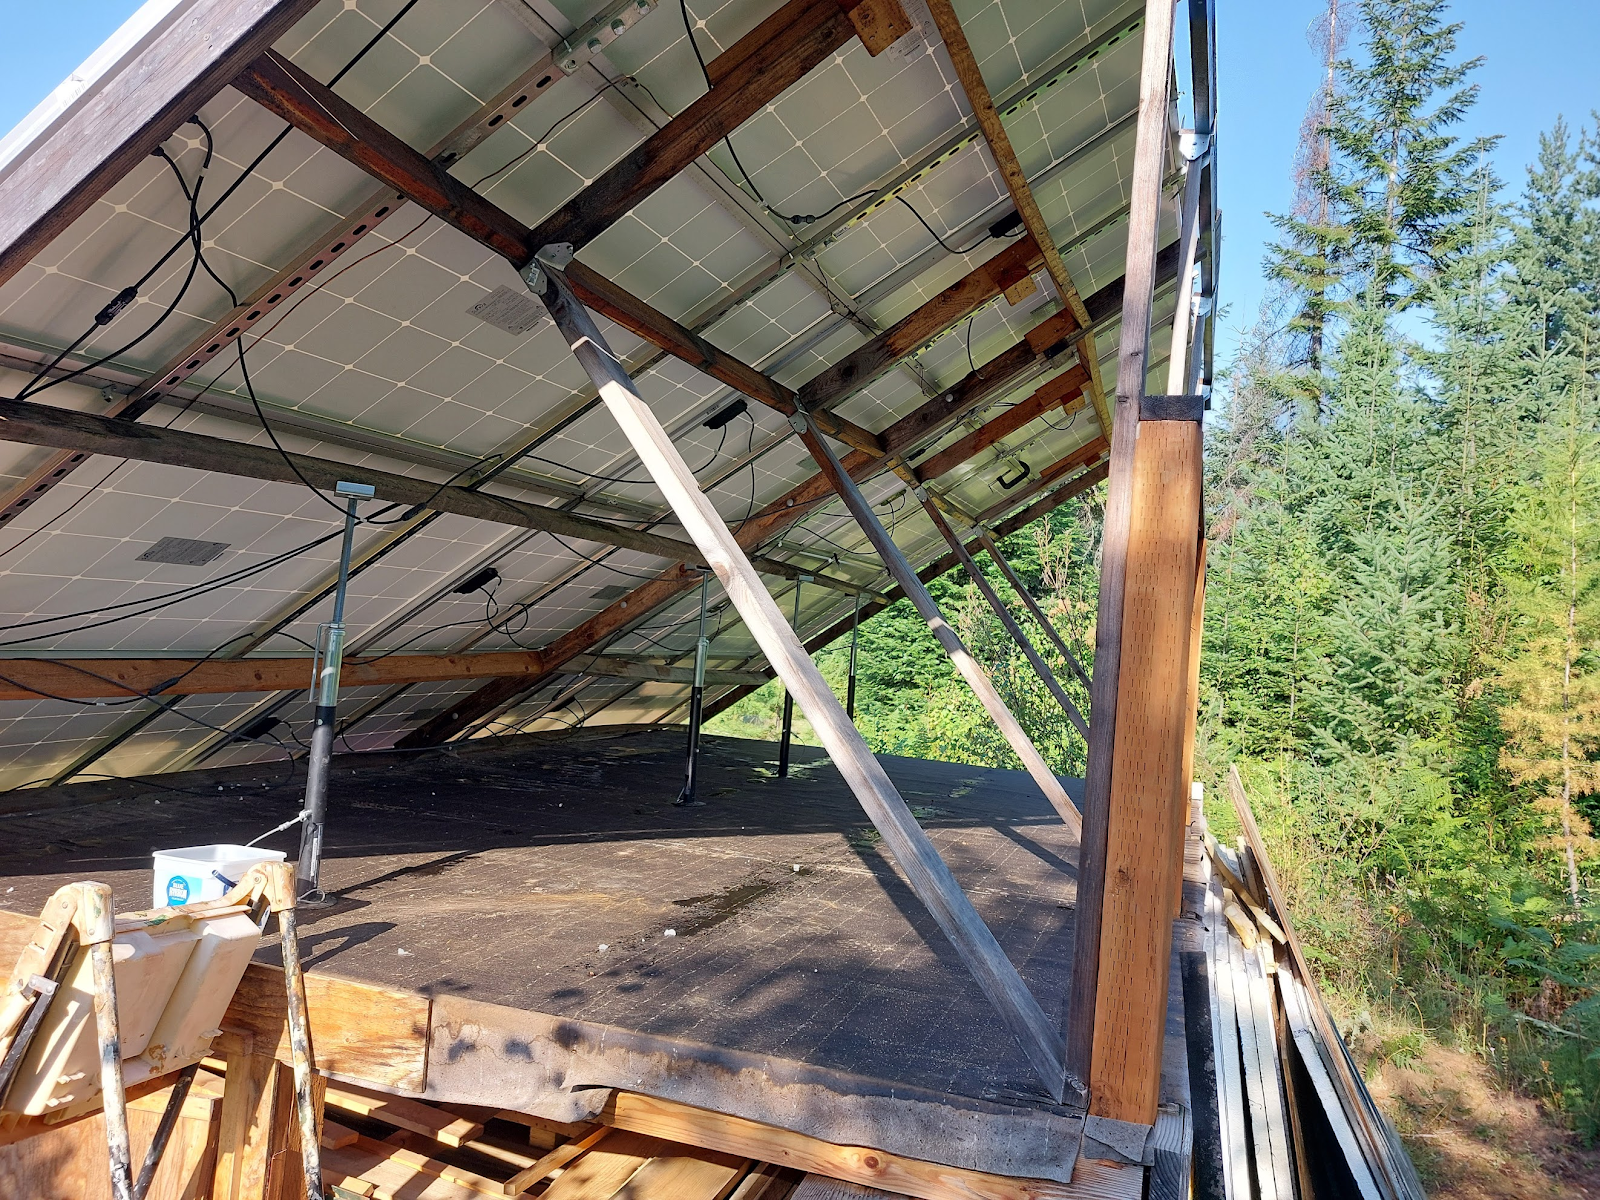


Since I had to dismantle the solar rack and all the solar panels, I thought is would be good to spend some time considering the new design and support rack.  First, I decided a wood rack was just not going to hold up to the severe winters, so it had to be a metal rack, preferably aluminum to minimize the weight. Secondly, the angle had to be increased to 45° to provide better shedding of the snow. Additionally, 45° was a better average fixed angle for my latitude (48°N). Lastly, I needed to increase the base height of the rack, as I didn't account for the accumulation of the shed snow. Even though the pedestal was about 4' high, the accumulated shed snow would fill up to the bottom half of the solar panels. I decided to add another 1-1/2 feet of height to the base, which would give me about 5-6 feet on the shed side.


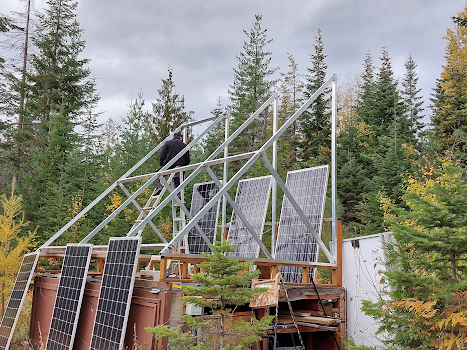
I started in about July in dismantling the old rack, I had to first uninstall all of the solar panels and wiring, then cut down the previous wood frame, all the way down to the rood of the pedestal.  I then put down a shingle roof on the pedestal and build a wooden frame to place on the new aluminum supports.  The supports were made at 45° angle with a support bar in the middle. I used 2"x3.5" rectangular tubing in which my son welded up for me.  I placed four (4) of these main supports to the existing 4x4 supports for the pedestal. I then used aluminum crossbars bolted together to add strength and mounting surface for the solar panels.


Once I had the new base and support rack in place, I reinstalled the solar panels in four (4) banks of three (3) panels each, to match the previous installation.  I got all of the panels installed except for the last 2, before winter set in. I mounted the 2 remaining panels vertically on the front of the pedestal, just to complete the electrical circuits. I plan on completing the installation in the spring once the snow melts.


The new solar rack did exceptionally well this winter. It shed the snow very well, and even when there was a lot of snow, it would shed very quickly when the sun came out. This winter was a very snowy year, we probably had between 60"-80" of snow.


I am very pleased with the new solar rack and am confident that it will hold up to the brutal winters and last us for many years.

Tuesday, January 24, 2023

Winter Wins Again!


 Winter access to our off-grid property has always been a major issue and concern. In the 13 years we have owned this property we have always struggled with having year-round access. Since we do not (yet) live full time on the property it is especially hard in the winter.  The goal has always been to have full access to the cabin, where I can drive in and out, regardless of season.  The first few years I made trip up to the cabin every time it snowed and managed to keep the road open for access. Once we started building the cabin and had a second access road, it was impossible to keep the road open once it snowed and iced over.  Over the years, I have tried many different things to either keep the road open or allow us to access the cabin. From a snowplow on my truck, to a large snow blower, a tractor with a bucket and blade, to a Polaris side-by-side UTV equipped with snow tracks and a V-Plow, each of these only provided limited success and winter access. The plow on the truck only worked if I was able to plow immediately after it snowed, which wasn't always possible, even the largest walk-behind snow blower, could keep up with the 3'-4' feet of snow that would accumulate. The tractor with the bucket wasn't very effective on long stretches of driveway and was difficult to pile the snow.  The V-plow on the polaris was only good for a few feet of snow, once the snow got too deep, it couldn't push the snow over the berm.

                                                Tractor with new 52" Snowblower attachment

This year, I went one step further and purchased a snowblower attachment for the tractor. The plan was to park the truck about 1/2 mile down on the forest service road from the cabin, snowshoe into the cabin, use the tractor with snow blower attachment to clear the driveway and road down to the USFS road where I parked and drive the truck into the cabin. I was confident this would be the year we would solve our winter access problem to the cabin.  But as they say, "so much for best laid plans".    This year we received about 3-1/2' of early snow in December.  I was eager to try out the new snow blower and clear the road so I could drive into the cabin.  When finally got to the cabin, cleared the snow off the tractor and started it up, I heard a loud "pop' when I engaged the snowblower PTO.  The chain driving the snowblower popped a link and fell off.  Snowblower was inoperable and I couldn't move the tractor.  Additionally, I didn't have chains on the tractor (I either misplaced them or someone stole them) so even after a couple hours of digging, I couldn't move the tractor.  

                                                Tractor with snowblower attachment stuck

I decided to use my trusted Polaris with snow tracks and V-Plow to try to clear the road, but the snow was so deep, I could only clear a couple feet of snow.  Trying to dig deeper into the snow, the V-Plow couldn't push the snow up over the berm.  I cleared the road enough to walk on, but not enough to drive on. To add to the problem, after plowing with the Polaris for a couple of hours, one of the front snow tracks fell off.  I didn't have any replacement nuts at the cabin, so I had to leave it where it broke down.  So now I had no way to clear the driveway or road, no Polaris and no tractor or snow blower.

                                                Polaris UTV minus one snow track

Over the next few weeks, I purchased some replacement links for the chain, some tread rolls to try to get the tractor unstuck. I got the chain fixed, but the tractor wasn't going anywhere without chains.

So I guess this isn't going to be the year that I solve the winter access to the cabin. I will find or replace the chains for the tractor and try again next year. I will get the track back on the Polaris and have it ready for backup for next year.   I will have to now wait for the snow to melt to be able to get both the tractor and Polaris out and fixed.   My wife Shelly says that maybe we should just make the cabin a summer cabin, which might be our next move if I can't solve this winter access problem.  As much as it frustrates me to be beaten every year by winter, I truly love being up at the cabin in the winter. There is something almost surreal being up there in complete wilderness in the middle of winter knowing there is no one around and seeing the snow all around. It's great to be sitting in a nice warm cabin with a fire burning looking out at the snow-covered mountains and trees, seeing the occasional, deer, elk, moose or other wildlife come by the cabin and think I am exactly where I should be.

Maybe next year will be our year, but as for 2022, I would say winter wins again....


Friday, January 24, 2020

Failed trip to cabin after snowstorm

Made an unsuccessful attempt to get to the cabin last weekend after a recent snowstorm. Thought it would be a good trip to clear off the new solar panel array, and test out my new winter access plan, which was leaving the Polaris RZR with snow tracks parked on the lower part of the property under the RV/Equipment cover. The idea was that the Polaris would be more safe and secure than leaving it parked out on the USFS road.  To access, I would have to drive the truck up to my lower access road, plow out a space to park the truck, snowshoe in about 1/2 mile to get to the Polaris, then take the Polaris back to the truck, load up and equipment and supplies and drive up to the cabin in the Polaris, which is on the top part of the property.

Well this trip was a complete bust, as I got the truck stuck within the first 5 minutes of trying to plow our a parking space.  One of may neighbors came by and pulled me out, however I got stuck again about 10 minutes after he left.  I then pulled out the electric winch which I have used in the past to pull me out. It is a Warn winch rated at about 11,000lbs. I have the truck setup where I can mount the winch on the front or back , whichever is needed. I have a power connector run to both the front and back. When I put the winch on and plugged it in, I had no power.   Don't know why but neither power connector had power so I could not use the electric winch. Luckily, I had a rope winch as a backup, and between that and a shovel, I managed to get myself out. This took over 4 hours and I was dead tired.

Then, I put on the snowshoes and attempted to walk in the 1/2 mile to get to the Polaris. The snow was so dry it would not support my weight. I was sinking into the snow about 3 feet, making almost impossible to walk. After only walking in about 50 yards, I decided I was too tired, and with the snow conditions, I would not be able to make it in.  This trip marks the 1st time since we purchased the property that I simply could not physically get to the cabin in the winter. It was more than a little humbling and frustrating, but yet another learning experience. In the 7 years we have owned this property, each winter has been a learning experience, and this winter is no exception.

While the Polaris with snow tracks, is a solid idea, the next challenge is going to be where I can park it in the winter to get to it reliably.  I think I am going to have to make a deal with one of my neighbors at the base of the mountain to park the Polaris there in the winter, even if I have to pay them to park. Another option will be to rent a storage unit in town (about 5 miles away) and store the Polaris there, and drive in from town.  We'll have to explore both options.

I made a video and posted on YouTube if you want to see the actual trip.

 YouTube Video of Cabin trip

(https://youtu.be/MvBvUQ8464I )

Wednesday, January 15, 2020

Drone View of our Off Grid property in Northern idaho

Here is a short drone video of our 40 acre off grid timber property in northern Idaho taken last winter. Provides some great views and new perspective of the property and surrounding area.


Tuesday, December 24, 2019

Adding a Solar Array

In 2019, a proper solar array was added. The solar array was installed on a south-facing ground mounted pedestal. Pedestal was 4 feet high to allow for local snow conditions. A hinged wooded frame with metal rails was installed to hold the 12-315W solar panels. Panels were wired into 4 strings of 3 panels connected to a 4-string combiner box. A 100 foot run of PV wire was run to the cabin and connected to a Midnite Classic 150 Solar Charge Controller.  A backup battery bank consisting of (8) 190AH sealed AGM batteries were installed for a 48VDC system. This is a backup up battery bank to the existing 1600AH 48V battery that is currently installed and will be replaced or reconditioned in the spring of 2020.


Solar pedestal starts with 12 4x4x8 pressure treated posts


2x6 boards and strand board added for floor and roof


Hinged wood frame with metal supports for panels


12 Solar panels (315W) added to frame


plywood sides and doors added to enclose pedestal


Solar panel array working as designed.
Will adjust angle in spring.


The solar array project was a complete success. The pedestal provides a strong base for the solar array and will keep the panels up out of the snow. The pedestal provides much needed storage for lumber and other construction materials. The angle of the array can be adjusted as needed. I am planning on using wall jacks to lift up the wall of solar panels to the desired angle in the spring.

With the solar panels now in place, I am able to leave the power on in the cabin all of the time, which allows me to keep a refrigerator and security system running at the cabin.   The next and final piece to the power system will be to add an automatic generator start (AGS)  which will start the generator automatically to charge the batteries should the voltage drop in the batteries to a preset level. This will help offset periods in which the solar panels will be covered by snow.

Adding a Bunkhouse

In 2019, we were still working on finishing after cabin after 4 years, we decided we needed to make some changes in our building/finishing plans. We have been working part time to complete the cabin, while still trying to utilize the cabin as we build. This has been a real challenge.  The cabin has most of the infrastructure in place, water system, plumbing, electrical and off grid power system. We are able to utilize the cabin as we are building but it is far from complete. We still have to complete some electrical, plumbing, propone, drywall, tongue and grove and interior finishing. We are to the point that the cabin is functional, but not yet 'comfortable', especially in the winter months.  So we decided, that we should not be trying to live in the cabin at the same time as we are trying to finish building the cabin.

We decided to add another structure near the cabin that we call the "Bunkhouse'. This will ultimately serve as some additional guest quarters, and more importantly will serve as some finished space for us to stay in as we complete the main cabin build. The bunkhouse is a 12x24 structure with 2 lofts. It has a wood stove, Futon folding bed, bunk beds, shower, toilet and sink and is fully insulated and finished so that we may stay there in both summer and winter comfortably as we complete finishing out the main cabin. We went with one of those 'prebuilt' style structures, but had it built on-site rather than trying to bring in a fully built structure given our remote location and the narrow dirt roads leading to our property.

The structure is set on 20 concrete piers. It has a an electrical sub-panel and plumbing system that is tied to the main cabin and septic system. It will have its own rain collection system, water purification system and on-demand hot water system.

Setting the bunkhouse floor joists on concrete piers

Bunkhouse is about 75 feet from main cabin

Builder's completed on-site construction in a single day


Bunkhouse exterior stained and stairs added

Bunkhouse interior fully insulated and finished

We still have some things to complete in the bunkhouse, but it is already a noticeably more comfortable stay than in the main cabin, especially in the winter. For example, as the main cabin is not yet completely sealed in, it can still get down to 40° even with a wood stove running in very cold weather. The bunkhouse on the other hand, is a much smaller space to heat and is very easy to keep between 60°-70° with a very small wood stove even in the coldest weather.   This will make it easier for us to work on the cabin in the winter months and provide a more comfortable stay during these colder periods.


Wednesday, August 21, 2019

Winter Access - the ongoing challenge

We knew going in that winter access to our property was going to be an ongoing challenge. Through the years, we have tried different approaches with varying degrees of success.  One of the main issues is not living up on the property full time to keep the roads open in the winter.  The first couple of years, before the cabin build was started, we stayed in the 32' travel trailer and 'dry' camped on weekends through the winter. We were able to keep the road open by using a plow on the front of the truck as long as we kept up with the snow as it fell. Once the snow accumulated between plowing we tried a large snow blower and our tractor with chains and a blade.  As long as we were only maintaining the lower road with access to the trailer, we managed pretty well even in the worst weather.  Once we started on the cabin build, we needed access from an  upper road, and we very soon found out we could not keep both roads open not being up on the property full time.  Since we would only go up on the weekends, we would literally spend the entire weekend just trying to clear the roads for access.  This was very hard on the equipment, the snow plow on the truck, the snow blower, and the tractor.

RV Cover and Truck with Snow Blade


After a season or two after the cabin build was started, we decided that since we were not going to be up there full time in the winter to try and maintain the roads, we decided to not even try to keep the roads open and plowed.  One year we only had access by snowshoes, that wasn't very much fun. The next year, we tried leaving a snowmobile parked down the mountain in a trailer, where we could park the truck and drive the rest of the way in with the snow mobile. That didn't work very well either as the trailer got snowed in and we would have to spend an hour or so digging out the trailer just to get to the snowmobile. Once we got the snowmobile, even it got stuck. I once got the runner stuck on a tree under the snow and had to walk back to the cabin in 3 feet of snow to get a come-a-long to pull me out.  I am a bit hesitant about snowmobiles. Someone once said that you should never drive any farther on a snowmobile than you are willing to walk back when it breaks down. I can attest to that.

Utility Trailer with Snowmobile inside !

Snowmobiles are great - until they ain't!


So it has been a real dilemma trying to figure out the best way to have reliable access in the winter where we can bring in multiple people, food and supplies, in any kind of weather and in any amount of snow. This year, I think I finally found the perfect solution. I purchased a Polaris RZR with snow tracks.  This is a 2-seater, side-by-side UTV with the wheels replaced in the winter with snow tracks. I put the regular wheels on in the summer to run around and work the property and then in winter the tracks go on. These tracks are amazing and it doesn't matter how much snow there is, it just rides on top. I don't even need a road and can go cross-country on the snow if I want to.  I also added a V-Plow on the front so I can plow if I want to , or just use the V-plow to push snow aside if there is lots of powder.  This is the ideal setup for reliable winter access in any kind of weather and in any amount of snow.  The Polaris also has a built-in heater so it is a comfortable ride even on the coldest days.

The ultimate Winter Access
Polaris RZR 800 with Tracks and V-Plow

Winter Access Problems - NO MORE !


The only remaining problem is where to park the UTV in the winter. I tried parking down at the bottom of the mountain as some of the other locals have done for years. Well, I guess the landowner who owns the spot where I parked didn't want anyone to park there any more so he went ahead and buried my UTV under the snow as a subtle hint that I am not to park there.  Luckily, after digging enough to get into the UTV and getting it started, it crawled right out of the snow pile like it was no problem.  I had to find another spot to park the UTV, so I left it at the entrance to our top property entrance. Even though this was a fairly remote area, someone still tried to break into it while it was parked there.

This year, I am going to try to park the UTV on my lower property under the RV cover.  I will be able to park my truck at the road entrance and will have to snowshoe in about 1/2 mile to get to the UTV, but at least it will be in a secure place. I can then ride the UTV back to where the truck will be parked, load up any people, equipment or supplies.

Lastly, since the UTV is only a 2-seater, I purchased a sled that I can take additional people, equipment or supplies as needed. Hopefully this will be the best solution for my winter access going forward.

Let it snow, let it snow, let it snow!!!


Here's a YouTube video of a trip up to the cabin in February 2020...